
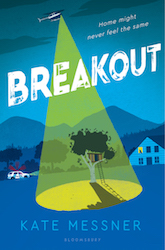
Countdown to Breakout is a 23-day blog series about the three-year writing process for BREAKOUT, which earned starred reviews from both School Library Journal and Publishers Weekly. It’s about a small-town prison break and manhunt that change the way three kids see their neighbors and the place they call home. Why a 23-day series? Because this book was inspired by the 2015 Clinton Correctional Facility prison break that led to a 23-day manhunt in June of 2015.
Revising on my own
One of the things that always surprises kids at my school visits is just how much revision real authors do before a book is published. I let them know that the books of mine in their school library are never first or second drafts. Or third or fourth drafts. Or fifth drafts or…you get the idea. Typically, I do anywhere from 12 to 20 drafts of a book before it’s good enough to be published. That includes complete rewrites as well as revisions based on comments and suggestions from critique partners and my editor. And BREAKOUT is no exception.
Here’s a look at what this book looked like during my revision process.

This is a program called Scrivener that I use when I’m drafting a new book, and I usually stick with it for my first six or seven revisions before switching over to Microsoft Word. Scrivener originated as a tool for screenwriters but is incredibly useful for novelists, too, because it allows you to plan and write by scene. This is basically how I outline, creating a little on-screen index card for each scene or chapter in the story. When you write that chapter, the full text is attached to the card, so you can move scenes around and try them out in new places simply by dragging the cards from place to place on your screen.
BREAKOUT is different from a regular novel in that it’s written entirely in documents, so in my later drafts of this book, instead of having 20 or 30 index cards representing chapters, I have 175 cards – each one representing a different document that does some of the storytelling.
And maybe you noticed that the cards are different colors on the screen. That’s because you can color code them to represent different voices or settings or whatever you want, as you write. In this case, each color represents a different kind of document. That made it easier for me to see how the pacing of the story was going, and how the different storytelling elements were balanced. Here’s a sample of how the color coding worked for BREAKOUT:
Purple = Nora’s letters
Red = morning announcements at school
Slate blue = Elidee’s letters
Royal blue = Lizzie’s letters
Purple blue = Owen’s comics
White = Recorded conversations
Pink = News stories & reports
Light blue = Miscellaneous (school assignments, recipes, petitions, carnival flyers, etc.)
This was all incredibly helpful to me as I revised BREAKOUT because I could see at a glance how well each major character was represented in the story and also how the pacing looked. For example, I knew that most of the humor in the book came from Owen, who makes mini-graphic-novels, and Lizzie, who wants to be a comedian when she grows up and writes parody news articles in the style of her favorite parody site, The Rutabaga (yes…that’s a play on The Onion.) So if I looked through the color-coded cards and found that a long time went by without any royal blue or purple, I’d take a closer look and see if there were places where the story in between might benefit from a dash of humor from Owen or Lizzie.
Once I’m out of ideas for how to revise in Scrivener, I print out my manuscript and read it aloud. (I used to be a strictly print-on-paper-and-mark-up-with-colored-pens-person, but lately I’ve been using an iPad Pro and Apple pencil and finding that works just as well but is easier on my home printer.)
As I read aloud, I make notes on the document for line-specific changes that I want to make like deleting sentences (or paragraphs or pages!), changing individual words, or combining scenes. I also jot ideas on Post-It notes for more global issues, like rethinking a character’s motivations over multiple scenes or going back to add more references to an issue earlier in the story.
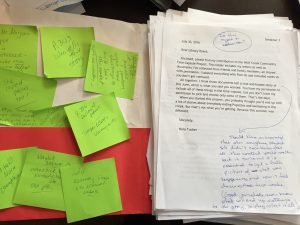
Here’s what some of those individual marked-up pages for BREAKOUT look like. (Don’t worry – I checked to make sure they’re spoiler free, so you can read them as carefully as you’d like without ruining the story. Also, these are from a revision pass on a relatively early draft, so some of these pages didn’t even make it into the final book.)
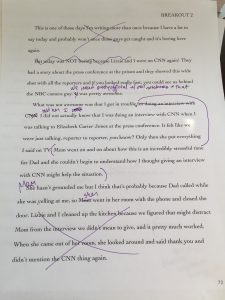
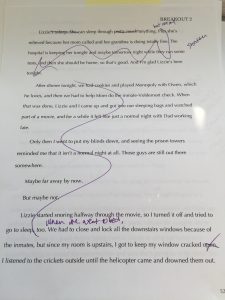

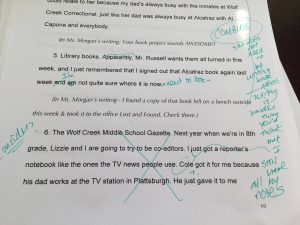
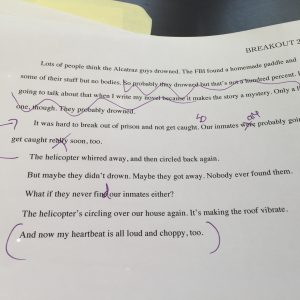
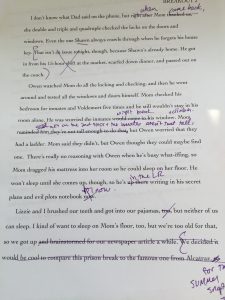
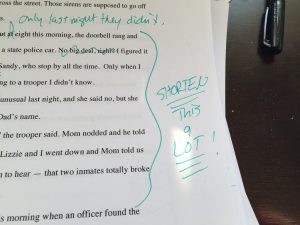
This is pretty much what every single page looks like as I work through a revision. I also have some specific big-picture tools I use at this stage of the revision process, and we’ll take a look at one of those tomorrow.
Today’s Assignment: Find a page of something you wrote. It can be anything – a short story, personal narrative, persuasive letter, poem…whatever. Read through it, and ask yourself “What’s one specific thing about this piece of writing that’s pretty great?” Then see if you can find places to add more of that element – whether it’s descriptive language or humor or sharp dialogue.
Thanks for joining me on this part of the Breakout writing-process journey! If you’d like to read the other posts in this series once they’re all posted, you can find them here.
Buy BREAKOUT now:
- IndieBound (find a local bookseller near you!)
- The Bookstore Plus, Lake Placid, NY
- Powells
- Barnes and Noble
- Amazon
Kate – Thank you for giving us a look at your revision process. I, like everyone, feel this is really difficult for students to grasp. Being able to show them often times helps, at least for some. Also, reading about the computer program that you use got me thinking… kids could write their stories on google slides, color code settings or character changes, slide them around where they needed and also “fill-in” the missing holes. I teach 5th grade. I feel the students that want to write and become better writers, may find this helpful and fun. What are your thoughts?
What a process. So interesting to see all the different steps you take.